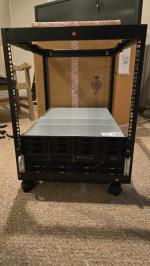
VEVOR AU EN
Select the country/region, language, and currency you prefer for shopping.
Delivery to
Your Address
Hello, Sign In
Account & Order
Free Delivery 30-day No-hassle Returns 12-month Warranty
VEVOR 9U 4 Post Open Frame Server Network Rack 584.2 to 1016 mm Adjustable Depth

Customer Reviews for VEVOR 9U 4 Post Open Frame Server Network Rack 584.2 to 1016 mm Adjustable Depth

Customer Reviews

Ratings by Features

  • 4.9
  • 4.7
  • 4.7
  • 4.8
  • See More See Less
87 Review(s)
Clear filters
Jacob Jacob
Decent small rack
Instructions could have been better and the material a bit thicker, but for its cost and use, this will be fine.
c3h8 c3h8
The bag of supplied screws will rapidly fill you with existential dread
[Briefly] Assembly took me about an hour and a half- the pieces are NOT symmetric and you need to follow along with the product manual to minimize how many pieces you install backwards or on the wrong spot. A power drill (with Phillips #2 bit) is absolutely necessary for assembly; the design drives screws directly into undersized metal holes. The only tapped portion of the frame are the four caster mounts. [Extended] In geometry class you should expect to encounter Euler’s formula for polyhedral, F + V = E + 2. The number of faces, plus corners is equal to the number of edges plus two. While assembling this box you will become intimately familiar with its consequences. The four edges running front to back are assembled from three pieces each to accommodate an adjustable depth. Two screws couple the front of the arm to the center, and another two couple the center to the back. 16 screws later and the bag seems as full as you started. Then, the vertical pillars are attached with a further two screws at each corner. 16 more screws, 32 in total. This bag only starts to show signs of use. The left and right sides are formed. The cross-bars are attached to link the two sides. A further two screws for each corner. 16 more, 48 in total. The bag remains about 3/4 full. Corner braces are now attached to firmly attach the cross bars to the sides forming the depth of the box. Four screws per brace, eight braces. 32 screws, 80 in total. The bag is still over half full. Finally, you can attach the top panel. Only 14 more screws needed. 94 Screws in Total. You find out that the top is only sized for one particular depth. Do you go back and fix this mistake, or can you finally start tightening all these screws?
Daniel D Dirksen Daniel D Dirksen
Good low cost rack
Just upfront, my comments and ratings are heavily considering the price, which was 30% less than other similar options I saw. The biggest complaint/issue for me was the packing. It came with the corner of the top cover/shelf bent up about an inch or so. I was able to hammer it flat enough to hardly notice, unless you know what you are looking for.   Comes with concrete expansion bolts to wall mount, also includes the casters all with brakes. Came with 16 standard rack clip mounts and bolts that use an allen wrench (included). Not familiar enough to compare quality but 1 clip did brake after a couple add/removes. The 12 Us are labeled both front and rear side, which is nice. The 2 trays that come with it, I assume would cover most random uses, I only needed 1 of them. Having 2 though gives options (imo). I put a small battery backup on the larger shelf which did sag a little, these are heavy so not surprised. It seems sturdy enough. Nothing seems overly cheap or flimsy. Assembly is pretty straight forward, the instructions aren't great, but they aren't the worst I have seen. I did end up having to reverse some parts, some of the side bar orientation wasn't really clear in the image, but they did specifically try to call out certain features like the caster holes for proper orientation (though the same parts have the U labeled so difficult to put upside down anyways. The adjustability is a nice feature if needed (I didn't), so cannot comment of sturdiness if fully expanded. Those particular bars came pre-assembled in the shortest configuration which was nice. The instructions did include steps to put them together as if they weren't.
Lindsey Taylor Pribble Lindsey Taylor Pribble
Sturdy av rack
Easy to put together, very sturdy.
Tom Tom
Tom
500% better then any other found unit. Very strong, both sides usable, neatly marked parts for assembly. OUTSTANDING… Tom
StorageAdmin StorageAdmin
Good for a cheap rack
Good for home server setup. Instructions are not very clear so I had to take it apart a couple times to get it right. Electric screwdriver or drill required! Unfortunately, when you extend the depth, it makes a large gap in the top plate.
Anonymous Consumer Anonymous Consumer
Adequate
I did not want to spend a lot of money on a rack and got what I paid for. Sturdy enough and (despite what the page says) holds 200 lbs! Excellent! Enough for 3 enterprise servers and some other things. You will need a power drill (and eye protection!)
VEVOR Customer VEVOR Customer
Good quality but not great instructions
Great quality and I like it. Just took a little to build since the instructions were somewhat unclear on the pieces labeled 4 and 5. Forced me to unscrew and flip some pieces around.
Rale Rale
Great Value
this thing is Awesome value. it pro grade? no, but its 12u, so you're probably using it for a home lab. Works great for me, perfect size for a couple servers, UPS, NAS and some networking equipment
Dallas Dallas
Great rack for the price
Took about an hour to put together. Other reviews have a lot of great information one thing I will say is I highly recommend having an impact driver, a drill would work but the screws can be fairly difficult to drive. For the price this is a great rack, very sturdy. Just make sure to pay attention to the manual and note the pictures.

People Who Bought This Item Also Bought

TOUGH TOOLS, HALF PRICE